Morph Driver Anim Node
This is a modified version of Epic’s Bone Driven Controller anim node. It is setup to drive morphs specifically and adds a rotation order option. If you are using the Bone Driven Controller to drive morphs and they pop at certain angles, this node may help.
For reference: Animation Blueprint Bone Driven Controller in Unreal Engine | Unreal Engine 5.0 Documentation
Using the Node
Short Version: Use it as you would for the Bone Driven Controller. There is an additional option on the node called Rotation Conversion Order that you can adjust to fix issues where the morph pops at certain bone rotations.
Long Version:
Create a Morph Driver Node. Here’s a simple setup:
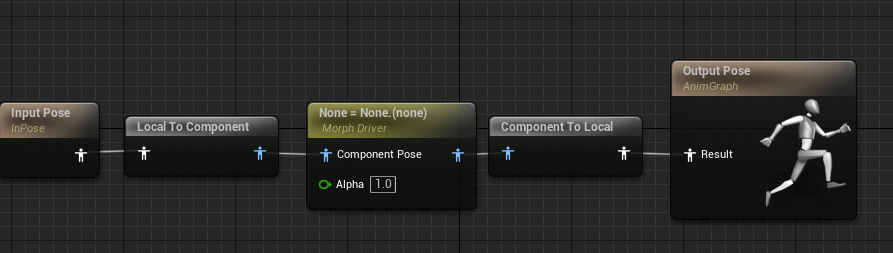
In the Details for the node set:
Source Bone to the bone you want to drive the morph.
Source Component to the rotation that you want to control the bone.
Remap Source to True (checked) and set the Source Range to the bone rotation range you want for driving the morph. In this case the morph gets applied as the left shin gets rotated from 0 to -90 on the Y axis.
Morph Name to the name of the morph you want the bone to drive.
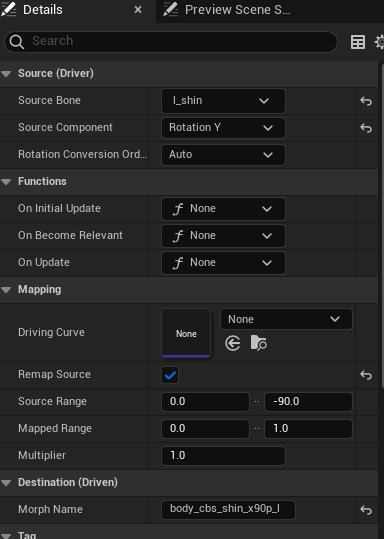
The Settings
Source Bone – The bone that you want to control the morph.
Source Component – The rotation axis you want to control the morph
Rotation Conversion Order – This is the difference between the Epic node and mine. You can try different rotation orders to avoid pops. Generally, you want the most active axis to be on the outside of the rotation name. For instance, if your joint rotates mostly on X and Y you probably want to try XZY or YZX. The rotation in the middle with have a limited range compared to the other two.
Remap Source – Most likely you want this turned on so you can map the bone’s rotation range to the curve values.
Source Range – The rotation angles of the bone that will affect the morph.
Mapped Range – The values of the morph that map to the angles in Source Range.
Multiplier – A multiplier for the morph output.
Morph Name – The name of the morph to drive.
Recent Comments